

E-commerce has long been a wellspring for technical innovations. The industry offers (1) bucket-loads of data, and (2) big financial rewards for those who can predict their customers' wants and needs. These two factors have made e-commerce a popular playground for many generations of machine learning (ML) and AI engineers.
The success of companies like Amazon and Netflix is a direct result of their obsession with scraping huge swathes of data and moulding that data into predictive insights.
Structured data has been key to e-commerce's early adoption of many AI technologies. However, that has led to a lack of adoption in the latest boom - generative AI. The reason for this is simple: past AI excelled with structured data - generative AI excels with unstructured data.
In this article, we will explore the cutting-edge of AI in e-commerce and how merging both generative and traditional AI technologies will enable the next wave of AI innovation in e-commerce.
Chatbots in E-commerce
Chatbots are the most visible tech adopted by e-commerce from the recent wave of gen AI. When used well, they have enabled improved UX and customer satisfaction, but they've been used to a tiny degree of their real potential in the industry.
Today, chatbots are typically thrown on e-commerce sites as a glorified FAQ autocomplete. Engineers will plug in some docs via a Retrieval Augmented Generation (RAG) pipeline to make the chatbot more "on-brand" and helpful when users have brand-specific queries - but this is as far as most gen-AI projects get in ecommerce.
In the past, e-commerce paved the way for huge technologies like approximate nearest neighbors search (ANNS) that unlocked billion-scale search and modern recommendation systems, giving us personalized product recommendations, ad targeting, and even the movies that Netflix surfaces to us on a Saturday night.
To look forward at the future of AI in ecommerce, we need to look back and understand how the latest advances in AI, such as graph neural networks (GNNs) and large language models (LLMs), can be used alongside the predictive analytics use-cases that made ecommerce the giant that it is today.
Predictive Agents
LLMs are not well-suited for parsing the huge-scale structured data that powers predictive analytics in e-commerce. An LLM is a brilliant synergizer of information but cannot read, memorize, and then synergize information at the scale we need in e-commerce. But when LLMs are used as tool-wielding agents, things get interesting.
With agents, our LLMs don't need to directly interact with our data. Instead, we can give our LLMs a set of tools that allow them to run predictive analytics with other AI-technologies that are suited for the scale and relation-building logic that we need.
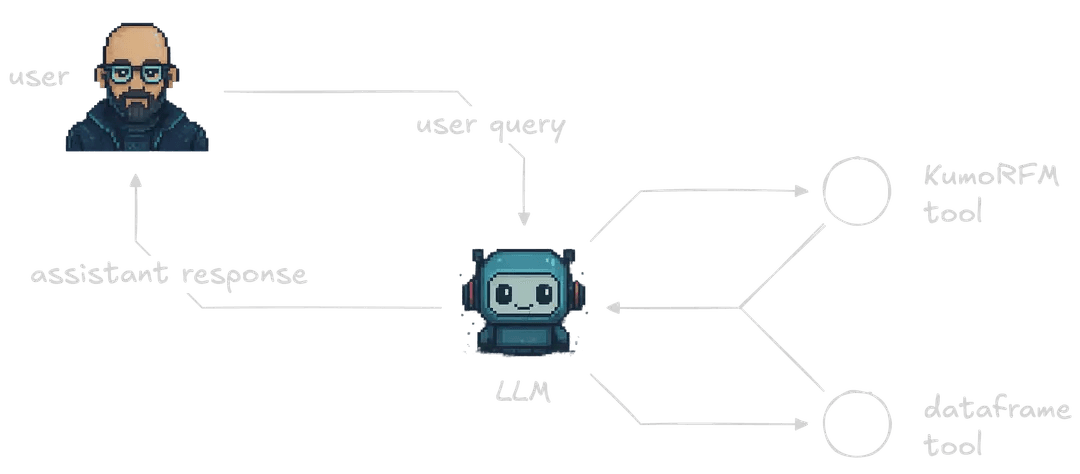
This is where Kumo's Relational Foundation Model (KumoRFM) comes in. KumoRFM is a merger between LLMs and GNNs. The LLM part allows KumoRFM to quickly discover and map relationships and data structures. The GNN part allows KumoRFM to make sense of those relationships and data structures and enable on-the-fly predictions to be made with no heavy pretraining.
By integrating KumoRFM into a broader agent, we are able to benefit from both general-purpose LLMs and Kumo's fast predictive analytics capabilities.
Initialize KumoRFM
We'll be jumping into the data preparation in a moment, but before we do, we'll need to initialize our KumoRFM instance. A free API key can be obtained by running the code below:
1import os
2from kumoai.experimental import rfm
3
4
5if not os.environ.get("KUMO_API_KEY"):
6   rfm.authenticate()
7
Then we initialize our local KumoRFM client like so:
1rfm.init(api_key=os.environ.get("KUMO_API_KEY"))
2
H&M Ecommerce Dataset
We're going to use a sample of the H&M ecommerce dataset. The sample is available on Hugging Face Datasets at jamescalam/hm-sample. It includes three tables: the customers table with 1.1K rows, articles with 5K rows, and transactions with 15.7K rows.
Let's begin with the customers table. We download and view its schema like so:
1from datasets import load_dataset
2
3
4customers = load_dataset(
5   "jamescalam/hm-sample", data_files="customers.jsonl", split="train"
6)
7customers
81Dataset({
2 features: [
3 'customer_id', 'FN', 'Active', 'club_member_status',
4 'fashion_news_frequency', 'age', 'postal_code'
5 ],
6 num_rows: 1100
7})
8Now moving onto articles:
1articles = load_dataset(
2   "jamescalam/hm-sample", data_files="articles.jsonl", split="train"
3)
4articles
51Dataset({
2 features: [
3 'article_id', 'product_code', 'prod_name', 'product_type_no',
4 'product_type_name', 'product_group_name', 'graphical_appearance_no',
5 'graphical_appearance_name', 'colour_group_code',
6 'colour_group_name', 'perceived_colour_value_id',
7 'perceived_colour_value_name', 'perceived_colour_master_id',
8 'perceived_colour_master_name', 'department_no', 'department_name',
9 'index_code', 'index_name', 'index_group_no', 'index_group_name',
10 'section_no', 'section_name', 'garment_group_no',
11 'garment_group_name', 'detail_desc'
12 ],
13 num_rows: 5000
14})
15Finally, our transactions:
1transactions = load_dataset(
2   "jamescalam/hm-sample", data_files="transactions.jsonl", split="train"
3)
4transactions
51Dataset({
2 features: [
3 't_dat', 'customer_id', 'article_id', 'price', 'sales_channel_id'
4 ],
5 num_rows: 15773
6})
7We read these into Kumo by first transforming our Hugging Face datasets into Pandas dataframes:
1customers_df = customers.to_pandas()
2articles_df = articles.to_pandas()
3transactions_df = transactions.to_pandas()
4
Once we have our dataframes, we will transform them into rfm.LocalTable objects. These are lightweight abstractions of pandas dataframes that allow us to interface our data with KumoRFM. We use the .infer_metadata() method to automatically infer what types of data we have in our tables:
1Detected primary key 'customer_id' in table 'customers'
2Detected time column 't_dat' in table 'transactions'
3Detected primary key 'article_id' in table 'articles'
41customers = rfm.LocalTable(customers_df, name="customers").infer_metadata()
2transactions = rfm.LocalTable(transactions_df, name="transactions").infer_metadata()
3articles = rfm.LocalTable(articles_df, name="articles").infer_metadata()
4We can update the column types as needed, like so:
1# update semantic type of columns
2customers["customer_id"].stype = "ID"
3customers["age"].stype = "numerical"
4
5
6# primary keys
7customers.primary_key = "customer_id"
8articles.primary_key = "article_id"
9
10
11# time column
12transactions.time_column = "t_dat"
13
Then we create the graph:
1# select the tables
2graph = rfm.LocalGraph(tables=[
3   customers, transactions, articles
4])
5# link the tables
6graph.link(src_table="transactions", fkey="customer_id", dst_table="customers")
71LocalGraph(
2 tables=[
3 customers,
4 transactions,
5 articles,
6 ],
7 edges=[
8 transactions.customer_id ⇔ customers.customer_id,
9 transactions.article_id ⇔ articles.article_id,
10 ],
11)
12We initialize the KumoRFM model within the Kumo local graph.
1model = rfm.KumoRFM(graph=graph)
2
Now we can make predictions. Let's see how likely one of our products is to be purchased over the next 30 days. Let's choose an article ID:
1article_id = articles_df.iloc[0].article_id.item()
2article_id
31675662003
2Let's see how often we can expect this article to be purchased:
1# forecast 30-day product demand for specific item/article
2df = model.predict(
3   f"PREDICT SUM(transactions.price, 0, 30, days) FOR articles.article_id={article_id}"
4)
5display(df)
61| | ENTITY | ANCHOR_TIMESTAMP | TARGET_PRED |
2| --- | ------ | ---------------- | ----------- |
3| 0 | 675662003 | 1600732800000 | 0.000009 |
4The likelihood of this article being purchased in the next 30 days is output in the TARGET_PRED column - with an almost zero probability of purchase at 0.000009.
That's okay, all we want right now is to see how to make predictions. Let's see how likely two specific customers are to purchase over the next 90 days.
1csample = customers_df.iloc[:2].customer_id.tolist()
2csample
31['1935b6baf9d28d1f19b7ffad18a9da418954a9bf38f59336f2f86d7a5615d1d2',
2'75ebdc56559b1f2739ce5832bd85a921ba827c72383135bdcc08a616d320e948']
3We'll use these two customer IDs.
1# predict likelihood of two specific users not ordering in the next 90 days
2df = model.predict(
3   "PREDICT COUNT(transactions.*, 0, 90, days)=0 "
4   f"FOR customers.customer_id IN ('{csample[0]}', '{csample[1]}')"
5)
6display(df)
71ENTITY ANCHOR_TIMESTAMP TARGET_PRED False_PROB True_PROB
20 1935b6baf9d28d1f19b7ffad18a9da418954a9bf38f593... 1600732800000 False 0.672468 0.327532
31 75ebdc56559b1f2739ce5832bd85a921ba827c72383135... 1600732800000 False 0.746204 0.253796
4This time, the TARGET_PRED column is a boolean value, indicating whether or not our prediction condition is true or false. In this case, we're asking KumoRFM to predict whether our customers will notorder in the next 90 days (note the =0 in our PREDICT query). So a TARGET_PRED of False means the customer will order.
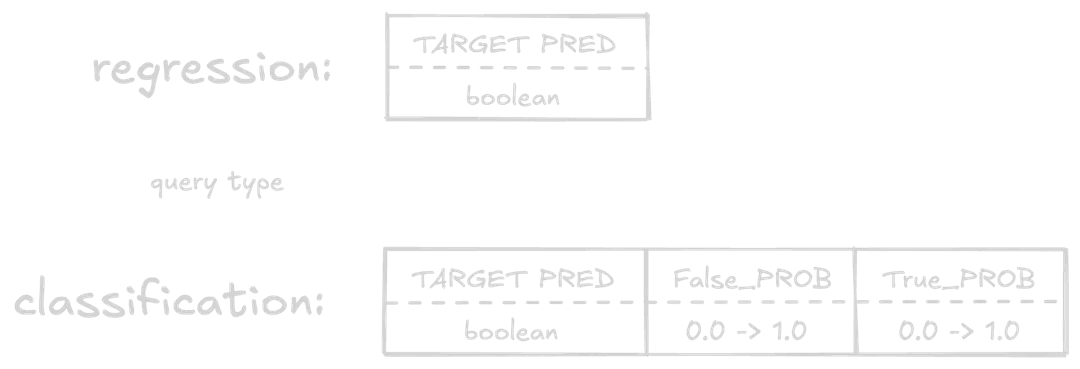
We also see two more columns here, False_PROB and True_PROB. These columns are the probability of the prediction being False and True, respectively, from 0.0 to 1.0. These are most useful when treated as confidence scores in our prediction.
We've seen how to make predictions with KumoRFM; the next step is integrating this into a fully-fledged e-commerce agent.
Building an Agent
For the core LLM in our agent, we'll use OpenAI and gpt-4.1-mini. This provider and model are completely interchangeable. You can use Anthropic, Mistral, or host locally; it's all possible and easy to swap out.
1import os
2from getpass import getpass
3
4os.environ["OPENAI_API_KEY"] = os.getenv("OPENAI_API_KEY") or \
5   getpass("Enter your OpenAI API key: ")
6
We then generate completions using both async and streaming like so:
1from openai import AsyncOpenAI
2
3client = AsyncOpenAI()
4
5response = await client.chat.completions.create(
6   model="gpt-4.1-mini",
7   messages=[
8       {"role": "user", "content": "Tell me something interesting about GNNs"}
9   ],
10   stream=True,
11)
12
13async for chunk in response:
14   if (token := chunk.choices[0].delta.content) is not None:
15       print(token, end="", flush=True)
16
Now we set up our agent with tools. We use the "no-framework" framework GraphAI.
Using this library, we are expected to create our own tool functions, LLM API calls, etc. The library primarily acts as a graph execution framework without any AI abstractions. With that in mind, we will first define two tools for our agent.
Tool One: Query Dataframes
The first tool runs a namespace exec instance, allowing our LLM to run Python code against our pandas dataframes.
With graphai, we typically define tools with two components: a pydantic BaseModel to outline the tool schema for our agent, and the Python function that will be executed when the tool is called.
1import json
2import pandas as pd
3from pydantic import BaseModel, Field
4from graphai import node
5from graphai.callback import EventCallback
6
7class QueryDataframes(BaseModel):
8   """Execute simple filtered queries on the ecommerce dataframes. Will execute code in
9   a namespace with the following dataframes:
10
11   - transactions_df
12   - articles_df
13   - customers_df
14
15   You can also access pandas library via `pd` for dataframe operations. Ensure you use
16   assign the results you need to the `out` variable, otherwise nothing will be returned
17   as this will be run with `exec()`. After execution we access the `out` variable and
18   return it to you.
19
20   If outputting a dataframe, you must use the .to_markdown() method to output an easily
21   readable markdown table.
22   """
23   query: str = Field(..., description="The python code to execute")
24
25
26@node(stream=True)
27async def query_dataframes(input: dict, state: dict, callback: EventCallback) -> dict:
28   try:
29       tool_call_args = json.loads(state["events"][-1]["tool_calls"][0]["function"]["arguments"])
30       # get dataframes, pandas, and set `out` to None
31       namespace = {
32           "transactions_df": state["transactions_df"],
33           "articles_df": state["articles_df"],
34           "customers_df": state["customers_df"],
35           "pd": pd,
36           "out": None,
37       }
38       # grab query from LLM to be executed
39       query = tool_call_args.get("query")
40       if not query:
41           raise ValueError("No query provided")
42       # remove escaped newlines as it frequently breaks the query
43       query = query.replace("\\n", "\n")
44       # execute query within predefined namespace
45       exec(query, namespace)
46       # pull out the `out` value
47       out = namespace.get("out")
48       if out is None:
49           out = "No result returned via the `out` variable"
50       content = [{"type": "text", "text": json.dumps(out, default=str)}]
51   except Exception as e:
52       content = [{
53           "type": "text",
54           "text": (
55               f"Error executing query: {str(e)}. "
56               "Please fix your query and trying again."
57           )
58       }]
59   # stream tool output
60   await callback.acall(
61       type="tool_output",
62       params={
63           "id": state["events"][-1]["tool_calls"][0]["id"],
64           "name": "predict_customer_purchase",
65           "arguments": tool_call_args,
66           "output": content[0]["text"]
67       }
68   )
69   # Add tool call event to state
70   event = {
71       "role": "tool",
72       "content": content,
73       "tool_call_id": state["events"][-1]["tool_calls"][0]["id"]
74   }
75   state["events"].append(event)
76   return {"input": {}}
77
Tool Two: Query KumoRFM
The second tool will provide access to KumoRFM's PQL queries. For this tool to work, we need to add some guidelines on how to use it for our agent. We'll first grab those. The full prompt used can be found here.
1import requests
2
3pql_file = requests.get(
4   "https://raw.githubusercontent.com/jamescalam/ecommerce-agent/refs/heads/main/api/pluto/prompts/developer.py"
5).text
6# strip first and last two lines as they contain python boilerplate
7pql_reference = "\n".join(pql_file.split("\n")[1:-2])
8print(pql_reference)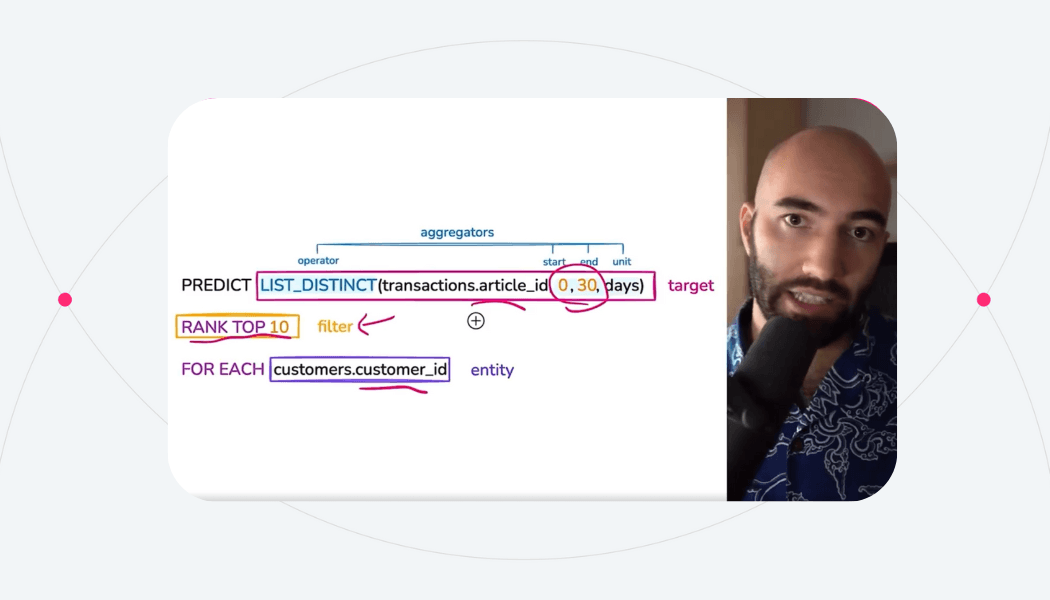
91# KumoRFM Predictive Query Language (PQL) Reference
2
3## Overview
4
5Predictive Query Language (PQL) is KumoRFM's declarative SQL-like syntax for defining predictive modeling tasks using the foundation model.
6
7## Core Structure
8
9### Basic Syntax
10\`\`\`sql
11PREDICT <target>
12FOR <entity> IN (<id1>, <id2>, ...)
13[WHERE <filter>]
14[ASSUMING <conditions>]
15\`\`\`
16
17### Minimum Requirements
18- **Entity**: Explicit list of entity IDs (required)
19- **Target**: What to predict (required)
20- **Filter**: Optional conditions to scale down results
21
22## Main Commands
23
24### PREDICT
25Defines the target variable to predict. Must start every PQL query.
26
27\`\`\`sql
28PREDICT SUM(transactions.price, 0, 30, days)
29PREDICT COUNT(transactions.*, 0, 30, days) = 0
30PREDICT FIRST(purchases.type, 0, 7)
31\`\`\`
32
33### FOR ... IN
34Specifies explicit entity IDs for predictions. KumoRFM requires specific entity lists, not general entity types.
35
36\`\`\`sql
37FOR customers.customer_id IN ('cust_123', 'cust_456', 'cust_789')
38FOR users.user_id IN ('user_abc', 'user_def')
39FOR products.product_id IN ('prod_1', 'prod_2', 'prod_3')
40\`\`\`
41
42### WHERE
43Applies filtering conditions. Can be used multiple times:
44- Entity filters
45- Target filters within aggregations
46- Conditional aggregations
47
48\`\`\`sql
49WHERE COUNT(transactions.*, -30, 0) > 0
50WHERE users.status = 'active'
51WHERE transactions.value > 50
52\`\`\`
53
54### ASSUMING
55Specifies conditions assumed true during prediction time. Used for hypothetical scenarios.
56
57\`\`\`sql
58ASSUMING COUNT(notifications.*, 0, 7) > 2
59ASSUMING LIST_DISTINCT(coupons.type, 0, 3) CONTAINS '50% off'
60\`\`\`
61
62## Aggregation Functions
63
64### Syntax
65\`\`\`sql
66AGGREGATION_FUNCTION(table.column, start, end, [time_unit])
67\`\`\`
68
69**Parameters:**
70- **start/end**: Time period boundaries (must be non-negative integers)
71- **end > start**: End value must be greater than start value
72- **time_unit**: days (default), hours, months
73
74### Available Functions
75
76| Function | Description | Example |
77|----------|-------------|---------|
78| `AVG()` | Average value | `AVG(sales.amount, 0, 30, days)` |
79| `COUNT()` | Count occurrences | `COUNT(transactions.*, -90, 0, days)` |
80| `COUNT_DISTINCT()` | Count unique values | `COUNT_DISTINCT(products.id, 0, 7)` |
81| `FIRST()` | First value in range | `FIRST(purchases.type, 0, 7)` |
82| `LAST()` | Last value in range | `LAST(sessions.status, -30, 0)` |
83| `LIST_DISTINCT()` | List of unique values | `LIST_DISTINCT(articles.id, 0, 7)` |
84| `MAX()` | Maximum value | `MAX(transactions.amount, 0, 30)` |
85| `MIN()` | Minimum value | `MIN(orders.value, -7, 0)` |
86| `SUM()` | Sum of values | `SUM(purchases.price, 0, 30, days)` |
87
88## Boolean Operators
89
90### Comparison Operators
91- `=` Equal
92- `!=` Not equal
93- `<` Less than
94- `<=` Less than or equal
95- `>` Greater than
96- `>=` Greater than or equal
97
98### Logical Operators
99- `AND` Logical AND
100- `OR` Logical OR
101- `NOT` Logical NOT
102
103### String Operations
104- `CONTAINS` String contains
105- `STARTS_WITH` String starts with
106- `ENDS_WITH` String ends with
107- `IN` Value in list
108- `LIKE` Pattern matching
109
110## Time Windows
111
112### Time Reference System
113- **Positive values**: Future time (0 = now, 30 = 30 days future)
114- **Negative values**: Past time (-90 = 90 days ago)
115- **Zero point**: Prediction time
116
117### Supported Time Units
118- `days` (default)
119- `hours`
120- `months`
121
122### Examples
123\`\`\`sql
124-- Last 90 days
125COUNT(transactions.*, -90, 0, days)
126
127-- Next 30 days
128COUNT(transactions.*, 0, 30, days)
129
130-- Last 3 months
131SUM(sales.amount, -3, 0, months)
132
133-- Next week in hours
134COUNT(sessions.*, 0, 168, hours)
135\`\`\`
136
137## Task Types
138
139Kumo automatically determines task type based on query structure:
140
141### 1. Regression
142Predicts continuous real number values.
143
144\`\`\`sql
145PREDICT SUM(transactions.price, 0, 30, days)
146FOR customers.customer_id IN ('cust_123', 'cust_456')
147\`\`\`
148
149### 2. Binary Classification
150Predicts true/false outcomes using comparison operators.
151
152\`\`\`sql
153PREDICT COUNT(transactions.*, 0, 30, days) = 0
154FOR customers.customer_id IN ('cust_123', 'cust_456')
155WHERE COUNT(transactions.*, -90, 0, days) > 0
156\`\`\`
157
158### 3. Multi-class/Multi-label Classification
159Predicts class labels.
160
161\`\`\`sql
162PREDICT FIRST(purchases.type, 0, 7)
163FOR users.user_id IN ('user_abc', 'user_def')
164\`\`\`
165
166### 4. Link Prediction
167Predicts lists of items using ranking.
168
169\`\`\`sql
170PREDICT LIST_DISTINCT(transactions.article_id, 0, 7)
171RANK TOP 10 FOR customers.customer_id IN ('cust_123', 'cust_456')
172\`\`\`
173
174## Temporal vs Static Queries
175
176### Temporal Queries
177- Predict aggregations over specific time windows
178- Require time columns
179- Handle complex temporal data splitting
180- Prevent data leakage through proper time-based splits
181
182\`\`\`sql
183PREDICT SUM(transactions.price, 0, 30, days)
184FOR customers.customer_id IN ('cust_123', 'cust_456')
185\`\`\`
186
187### Static Queries
188- Do not require time columns
189- Use random 80/10/10 data split
190- Simpler data handling
191
192\`\`\`sql
193PREDICT user.category
194FOR users.user_id IN ('user_abc', 'user_def')
195WHERE users.active = true
196\`\`\`
197
198## Advanced Features
199
200### Nested Filters
201\`\`\`sql
202COUNT(orders.* WHERE orders.status = 'completed' AND orders.value > 50, -30, 0)
203\`\`\`
204
205### Multiple Conditions
206\`\`\`sql
207PREDICT COUNT(sessions.*, 0, 7) > 10 OR SUM(transactions.value, 0, 5) > 100
208FOR users.user_id IN ('user_123', 'user_456')
209WHERE users.status = 'active' AND COUNT(sessions.*, -30, 0) > 5
210\`\`\`
211
212### Inline Filters
213\`\`\`sql
214SUM(transactions.price WHERE transactions.category = 'electronics', 0, 30)
215\`\`\`
216
217### Column References
218- Format: `table.column` or `table.*`
219- Supports dot notation for nested fields
220- Use `*` to reference all columns/records
221
222### Ranking (Link Prediction)
223\`\`\`sql
224PREDICT LIST_DISTINCT(products.id, 0, 30)
225RANK TOP 5 FOR customers.customer_id IN ('cust_123', 'cust_456')
226\`\`\`
227
228## Complete Examples
229
230### Customer Churn Prediction (Binary Classification)
231\`\`\`sql
232PREDICT COUNT(transactions.*, 0, 30, days) = 0
233FOR customers.customer_id IN ('cust_123', 'cust_456', 'cust_789')
234WHERE COUNT(transactions.*, -90, 0, days) > 0
235\`\`\`
236*Predicts if active customers will churn in next 30 days*
237
238### Revenue Forecasting (Regression)
239\`\`\`sql
240PREDICT SUM(transactions.price, 0, 30, days)
241FOR customers.customer_id IN ('gold_cust_1', 'platinum_cust_2')
242\`\`\`
243
244### High-Value Transaction Prediction
245\`\`\`sql
246PREDICT COUNT(transactions.* WHERE transactions.value > 100, 0, 7)
247FOR users.user_id IN ('user_abc', 'user_def', 'user_ghi')
248WHERE COUNT(transactions.*, -30, 0) > 5
249\`\`\`
250
251### Product Recommendation (Link Prediction)
252\`\`\`sql
253PREDICT LIST_DISTINCT(purchases.product_id, 0, 14)
254RANK TOP 10 FOR customers.customer_id IN ('cust_123', 'cust_456')
255WHERE COUNT(sessions.*, -7, 0) > 0
256\`\`\`
257
258### Multi-Category Classification
259\`\`\`sql
260PREDICT FIRST(transactions.category, 0, 30)
261FOR customers.customer_id IN ('active_cust_1', 'active_cust_2')
262\`\`\`
263
264### Complex Conditional Prediction
265\`\`\`sql
266PREDICT (COUNT(premium_features.*, 0, 30) > 5) AND (SUM(usage.minutes, 0, 30) > 1000)
267FOR users.user_id IN ('trial_user_1', 'trial_user_2')
268WHERE users.subscription_type = 'trial'
269ASSUMING COUNT(notifications.*, 0, 7) > 3
270ASSUMING marketing_campaigns.type = 'premium_upgrade'
271\`\`\`
272
273### Product Recommendation with Ranking
274\`\`\`sql
275PREDICT LIST_DISTINCT(transactions.article_id, 0, 30)
276RANK TOP 10 FOR customers.customer_id IN ('cust_123', 'cust_456')
277\`\`\`
278
279### Predict Most Valuable Customers Over Next 30 Days From Sample
280\`\`\`sql
281PREDICT SUM(transactions.price, 0, 30, days)
282FOR customers.customer_id IN ('cust_123', 'cust_456')
283\`\`\`
284
285*IMPORTANT: when using RANK TOP K you CANNOT set K=1, so if finding the top customer just use RANK TOP 2*
286
287### Predict Most Likely Purchases For Customer Over Next 30 Days
288\`\`\`sql
289PREDICT LIST_DISTINCT(transactions.article_id, 0, 30, days)
290RANK TOP 5 FOR customers.customer_id = 'cust_123'
291\`\`\`
292
293## Syntax Rules & Constraints
294
295### Time Window Rules
2961. Both start and end must be non-negative integers
2972. End value must be greater than start value
2983. Time unit defaults to 'days' if not specified
299
300### Entity Rules
3011. Must specify explicit entity IDs using IN clause
3022. Use `FOR table.column IN (id1, id2, ...)` format
3033. Entity IDs must exist in your graph schema
3044. Cannot use `FOR EACH` - must provide specific entity list
305
306### Target Rules
3071. Must use `PREDICT` as first command
3082. Can combine multiple conditions with AND/OR/NOT
3093. Comparison operators create classification tasks
3104. Raw aggregations create regression tasks
311
312### Filter Rules
3131. WHERE clauses can be nested and combined
3142. Support both static and temporal conditions
3153. Can filter at entity level or within aggregations
3164. Multiple WHERE clauses are combined with AND
317
318## Best Practices
319
320### Performance Optimization
3211. **Filter Early**: Use WHERE clauses to reduce computation
3222. **Choose Appropriate Time Windows**: Match business context
3233. **Entity Selection**: Filter entities to relevant subset
324
325### Query Design
3261. **Start Simple**: Begin with basic queries, add complexity gradually
3272. **Test Incrementally**: Validate each component before combining
3283. **Clear Intent**: Make prediction goal explicit in target definition
329
330### Temporal Considerations
3311. **Avoid Data Leakage**: Use proper time boundaries
3322. **Balance Splits**: Ensure sufficient data in each time period
3333. **Business Logic**: Align time windows with business cycles
334
335### Task Type Selection
3361. **Regression**: Use for continuous predictions
3372. **Classification**: Use comparison operators for categories
3383. **Link Prediction**: Use LIST_DISTINCT with RANK TOP K
3394. **Multi-class**: Use FIRST/LAST for category prediction
340
341## Error Prevention
342
343### Common Mistakes
3441. **Invalid Time Windows**: Ensure end > start and both ≥ 0
3452. **Missing Entities**: Verify entity exists in graph
3463. **Type Mismatches**: Match aggregation functions to data types
3474. **Data Leakage**: Don't reference future data in historical queries
348
349### Validation Checklist
350- [ ] Entity specified with FOR table.column IN (...)
351- [ ] Target defined with PREDICT
352- [ ] Time windows follow start < end rule
353- [ ] Filters reference valid columns
354- [ ] Syntax follows SQL-like structure
355- [ ] Time boundaries prevent data leakage
356- [ ] No use of FOR EACH (KumoRFM requires explicit entity lists)
357Given the size of these guidelines, we'll insert them directly into our system/developer message rather than our tool description.
Now we define the KumoRFM tool like so:
1class KumoRFM(BaseModel):
2   """This tool allows you to write any PQL query to the KumoRFM model.
3   """
4   query: str = Field(..., description="The PQL query to predict")
5
6
7@node(stream=True)
8async def kumorfm(input: dict, state: dict, callback: EventCallback) -> dict:
9   try:
10       tool_call_args = json.loads(state["events"][-1]["tool_calls"][0]["function"]["arguments"])
11       query = tool_call_args.get("query")
12       if not query:
13           raise ValueError("No query provided")
14
15       df = state["kumorfm"].predict(query)
16       out = df.to_dict(orient="records")
17       content = [{"type": "text", "text": json.dumps(out)}]
18   except Exception as e:
19       content = [{"type": "text", "text": str(e)}]
20   # stream tool output
21   await callback.acall(
22       type="tool_output",
23       params={
24           "id": state["events"][-1]["tool_calls"][0]["id"],
25           "name": "predict_customer_purchase",
26           "arguments": tool_call_args,
27           "output": content[0]["text"]
28       }
29   )
30   event = {
31       "role": "tool",
32       "content": content,
33       "tool_call_id": state["events"][-1]["tool_calls"][0]["id"]
34   }
35   state["events"].append(event)
36   return {"input": {}}
37
For our LLM to be able to read our tool schemas, we will be using the built-in FunctionSchema method. We can use this to consume our pydantic base models and later output them into an OpenAI-friendly schema format.
1from graphai.utils import FunctionSchema
2
3
4query_df_schema = FunctionSchema.from_pydantic(QueryDataframes)
5query_df_schema.name = "query_dataframes"
6kumorfm_schema = FunctionSchema.from_pydantic(KumoRFM)
7kumorfm_schema.name = "kumorfm"
8
9
10tools = [query_df_schema, kumorfm_schema]
11
The schemas can then be created using the to_openai method (when using OpenAI models).
1tools[1].to_openai(api="completions")
21{'type': 'function',
2'function': {'name': 'kumorfm',
3 'description': 'This tool allows you to write any PQL query to the KumoRFM model.\n ',
4 'parameters': {'type': 'object',
5 'properties': {'query': {'description': 'The PQL query to predict',
6 'type': 'string'}},
7 'required': ['query']}}}
8Defining our Agent Graph
Graphs are constructed from nodes and edges, with various special nodes and edges within that broader structure. For our use case, we don't need to dive into anything too exotic. All we need to do is define our nodes and construct our graph to join those together.
Nodes
The graph will consist of five total nodes, two of which we have already defined with our tools. The remaining three are:
llmrouter node will contain the logic for calling our LLM and handling our LLM's tool-calling decisions.startandendnodes aregraphai-specific boilerplate; they act as the entry and exit points of our graph
We will first define the llm router:
1from graphai import router
2
3
4@router(stream=True)
5async def llm(input: dict, state: dict, callback: EventCallback) -> dict:
6   # get client initialized in lifespan
7   client = state["client"]
8   # call openai (or another provider as preferred)
9   stream = await client.chat.completions.create(
10       model="gpt-4.1-mini",
11       messages=state["events"],
12       tools=[x.to_openai(api="completions") for x in tools],
13       stream=True,
14       seed=9000,  # keep consistent results
15       parallel_tool_calls=False,
16   )
17   direct_answer: str = ""
18   tool_call_args = ""
19   async for chunk in stream:
20       if (token := chunk.choices[0].delta.content) is not None:
21           # this handles direct text output
22           direct_answer += token
23           await callback.acall(token=token)
24       # handle tool calls
25       tool_calls_out = chunk.choices[0].delta.tool_calls
26       if tool_calls_out and (tool_name := tool_calls_out[0].function.name) is not None:
27           # this handles the initial tokens of a tool call
28           tool_call["id"] = tool_calls_out[0].id
29           tool_call["name"] = tool_name
30           # we can return the tool name
31           await callback.acall(
32               type="tool_call",
33               params=tool_call
34           )
35       elif tool_calls_out and (tool_args := tool_calls_out[0].function.arguments) is not None:
36           # this handles the arguments of a tool call
37           tool_call_args += tool_args
38           # we can output these too
39           await callback.acall(
40               type="tool_args",
41               params={
42                   **tool_call,
43                   "arguments": tool_args
44               }
45           )
46   if direct_answer:
47       # if we got a direct answer we create a standard assistant message
48       state["events"].append(
49           {
50               "role": "assistant",
51               "content": direct_answer,
52           }
53       )
54       # choice controls the next node destination
55       choice = "end"
56   elif tool_call:
57       # if we got a tool call we create an assistant tool call message
58       state["events"].append(
59           {
60               "role": "assistant",
61               "tool_calls": [{
62                   "id": tool_call["id"],
63                   "type": "function",
64                   "function": {
65                       "name": tool_call["name"],
66                       "arguments": tool_call_args,
67                   }
68               }]
69           }
70       )
71       choice = tool_call["name"]
72   return {"input": input, "choice": choice}
73
And now our two boilerplate start and end nodes:
1@node(start=True)
2async def start(input: dict) -> dict:
3   return {"input": input}
4
5@node(end=True)
6async def end(input: dict, state: dict) -> dict:
7   return {"output": state["events"]}
8
Connecting the Nodes
Our broader graph contains the logic that connects our various nodes and defines the initial state of the workflow. We will first define our state, which will consist of our initial system/developer message, our KumoRFM instance, and the three H&M dataframes.
We will begin by defining the developer message:
1dev_message = {
2   "role": "developer",
3   "content": (
4       "You are a helpful assistant that uses the various tools and "
5       "KumoRFM integration to answer the user's analytics questions "
6       "about our H&M ecommerce dataset."
7       "\n"
8       "When answering questions, you may use the various tools "
9       "multiple times before answering to the user. You should aim "
10       "aim to have all of the information you need from the tools "
11       "before answering the user."
12       "\n"
13       "There is a limit of 30 steps to each interaction, measured "
14       "as the number of tool calls made between the user's most "
15       "recent message and your response to the user. Keep that limit "
16       "in mind but ensure you are still thorough in your analysis."
17       # remember to include our KumoRFM reference guide
18       "\n\n"
19       "## PQL (Predictive Query Language) Reference\n"
20       "Use this syntax when working with KumoRFM predictions:\n"
21       "\n"
22       f"{pql_reference}"
23   )
24}
25
And now our initial state:
1initial_state = {
2   "events": [dev_message],
3   "kumorfm": model,
4   "transactions_df": transactions_df,
5   "articles_df": articles_df,
6   "customers_df": customers_df,
7   "client": client
8}
9
This state can be added to our graph using the set_state method. Alongside this, we will also be adding the various nodes and routers to our graph with add_node and add_router. We then set all edges with add_edge. Finally, once our graph is fully defined, we compile it.
1from graphai import Graph
2
3
4# create graph
5graph = (
6   Graph(max_steps=30)
7   .set_state(initial_state)
8   .add_node(start)
9   .add_node(llm)
10   .add_node(kumorfm)
11   .add_node(query_dataframes)
12   .add_node(end)
13   .add_router(
14       sources=[start],
15       router=llm,
16       destinations=[
17           kumorfm,
18           query_dataframes,
19           end
20       ]
21   )
22   .add_edge(kumorfm, llm)
23   .add_edge(query_dataframes, llm)
24   .add_edge(llm, end)
25   .compile()
26)
27
Testing the E-commerce Agent
The agent is now fully defined, and we can start using it. We call it with await graph.execute like so:
1import asyncio
2
3cb = EventCallback()
4# add our input message to the state
5graph.update_state({
6   "events": [
7       *graph.state["events"],
8       {
9           "role": "user",
10           "content": f"Can you predict the demand for article {article_id} over the next 30 days"
11       }
12   ]
13})
14# now execute
15_ = asyncio.create_task(
16   graph.execute({"input": {}}, callback=cb)
17)
18
19# and (optionally) stream the output
20async for event in cb.aiter():
21   if str(event.type) == "callback":
22       # this indicates direct text output
23       print(event.token, end="", flush=True)
24   elif event.type == "tool_call":
25       # this indicates the first event in a tool call
26       # this contains tool name and ID
27       print(event.params["name"], flush=True)
28   elif event.type == "tool_args":
29       # this indicates the arguments of a tool call
30       print(event.params["arguments"], end="", flush=True)
31   elif event.type == "tool_output":
32       # this indicates the output of a tool call
33       # these can be very long so we'll avoid printing them
34       # but feel free to try
35       #print(event.params["output"])
36       print()
37       pass
381import asyncio
2
3cb = EventCallback()
4# add our input message to the state
5graph.update_state({
6 "events": [
7 *graph.state["events"],
8 {
9 "role": "user",
10 "content": f"Can you predict the demand for article {article_id} over the next 30 days"
11 }
12 ]
13})
14# now execute
15_ = asyncio.create_task(
16 graph.execute({"input": {}}, callback=cb)
17)
18
19# and (optionally) stream the output
20async for event in cb.aiter():
21 if str(event.type) == "callback":
22 # this indicates direct text output
23 print(event.token, end="", flush=True)
24 elif event.type == "tool_call":
25 # this indicates the first event in a tool call
26 # this contains tool name and ID
27 print(event.params["name"], flush=True)
28 elif event.type == "tool_args":
29 # this indicates the arguments of a tool call
30 print(event.params["arguments"], end="", flush=True)
31 elif event.type == "tool_output":
32 # this indicates the output of a tool call
33 # these can be very long so we'll avoid printing them
34 # but feel free to try
35 #print(event.params["output"])
36 print()
37 pass
38Here we can see a few print statements as our agent is calling the kumorfm node/tool multiple times. The reason it is doing this is that the syntax in queries one and two is incorrect, so an error would have been returned to our agent, and a correction to the query would have been made before attempting again. On the third try, the query syntax is correct, and we see the text response from our agent follow. Our agent predicts an extremely low demand for this specific article.
Let's try some more queries, but first, we can write a helper function to keep the chat history tracking and agent execution calls a little simpler:
1async def chat(content: str):
2   cb = EventCallback()
3   graph.update_state({
4       "events": [
5           *graph.state["events"],
6           {"role": "user", "content": content}
7       ]
8   })
9
10
11   _ = asyncio.create_task(
12       graph.execute({"input": {}}, callback=cb)
13   )
14
15   async for event in cb.aiter():
16       if str(event.type) == "callback":
17           # this handles direct text output
18           print(event.token, end="", flush=True)
19       elif event.type == "tool_call":
20           # this indicates the first event in a tool call
21           # this contains tool name and ID
22           print(event.params["name"], flush=True)
23       elif event.type == "tool_args":
24           # this indicates the arguments of a tool call
25           print(event.params["arguments"], end="", flush=True)
26       elif event.type == "tool_output":
27           # this indicates the output of a tool call
28           # these can be very long so we'll avoid printing them
29           # but feel free to try
30           #print(event.params["output"])
31           print()
32           pass
33
Now let's try:
1await chat(
2   "What other useful info can you give me? I'm preparing our monthly marketing "
3   "emails"
4)
5
Our agent queries the dataframes once to understand the available data:
1query_dataframes
2{"query":"# Let's look into some potentially useful insights for marketing emails\n# 1. Top selling articles in last 30 days\n# 2. Customer segments based on purchase behavior\n# 3. Popular categories\n\n# Top selling articles in last 30 days\ntop_selling_articles = transactions_df[transactions_df['t_dat'] > (transactions_df['t_dat'].max() - pd.Timedelta(days=30))]\ntop_selling_articles = top_selling_articles.groupby('article_id').agg({'price': 'sum'}).reset_index().sort_values(by='price', ascending=False).head(10)\n\n# Popular categories in last 30 days\npopular_categories = transactions_df[transactions_df['t_dat'] > (transactions_df['t_dat'].max() - pd.Timedelta(days=30))]\npopular_categories = popular_categories.merge(articles_df[['article_id', 'product_type_name']], on='article_id')\npopular_categories = popular_categories.groupby('product_type_name').agg({'price': 'sum'}).reset_index().sort_values(by='price', ascending=False).head(5)\n\n# Customer segments based on purchase frequency and recency\ncustomers_last_purchase = transactions_df.groupby('customer_id').agg({'t_dat': 'max', 'price': 'sum', 'article_id': 'count'}).reset_index()\ncustomers_last_purchase['days_since_last_purchase'] = (transactions_df['t_dat'].max() - customers_last_purchase['t_dat']).dt.days\n\n# Creating simple segments\nfrequent_customers = customers_last_purchase[customers_last_purchase['article_id'] > 5]\ninfrequent_customers = customers_last_purchase[(customers_last_purchase['article_id'] <= 5) & (customers_last_purchase['days_since_last_purchase'] <= 30)]\ndormant_customers = customers_last_purchase[customers_last_purchase['days_since_last_purchase'] > 30]\n\nout = {\n    'top_selling_articles': top_selling_articles,\n    'popular_categories': popular_categories,\n    'frequent_customers_count': frequent_customers.shape[0],\n    'infrequent_customers_count': infrequent_customers.shape[0],\n    'dormant_customers_count': dormant_customers.shape[0]\n}"}
3
Then the agent uses this data to produce the following answer:
1For your monthly marketing emails, here are some useful insights:
2
31. Top Selling Articles in the Last 30 Days:
4| article_id | price   |
5|------------|---------|
6| 894763002  | 1.09322 |
7| 902419001  | 0.35525 |
8| 891898001  | 0.33890 |
9| 914805002  | 0.30498 |
10| 904625001  | 0.29649 |
11| 863583002  | 0.26807 |
12| 906169002  | 0.26434 |
13| 873279006  | 0.25414 |
14| 926638001  | 0.23898 |
15| 932383001  | 0.23722 |
16
172. Popular Product Categories in the Last 30 Days:
18| product_type_name | price   |
19|-------------------|---------|
20| Trousers          | 2.21549 |
21| Sweater           | 2.17353 |
22| Dress             | 1.33981 |
23| Coat              | 1.26102 |
24| Jacket            | 0.78636 |
25
263. Customer Segments by Purchase Behavior:
27- Frequent Customers (more than 5 purchases): 634
28- Infrequent Customers (5 or fewer purchases but recent): 12
29- Dormant Customers (no purchases in last 30 days): 750
30
31You can tailor your marketing campaigns targeting frequent customers with loyalty offers, infrequent customers with engagement offers, and dormant customers with reactivation campaigns. Featuring the top-selling articles and popular categories in emails might increase sales effectively.
32
Let's continue the conversation:
1await chat("Can you help me find customers likely to churn?")
2
Both query_dataframes and kumorfm tools are used this time:
1 kumorfm
2{"query":"PREDICT COUNT(transactions.*, 0, 30, days) = 0\nFOR customers.customer_id IN (SELECT DISTINCT customer_id FROM transactions_df) \nWHERE COUNT(transactions.*, -90, 0, days) > 0"}
3query_dataframes
4{"query":"# Fetch all distinct customer_ids from transactions\ndistinct_customers = transactions_df['customer_id'].unique().tolist()\nout = distinct_customers[:50]  # Limiting to first 50 for prediction sample"}
5kumorfm
6{"query":"PREDICT COUNT(transactions.*, 0, 30, days) = 0\nFOR customers.customer_id IN ('8ef783d3815860cc145c2923f740f88728e373f2c3cb37aa638c15810ac531cc', '2d545e697d8cf36558c81eb56c1776cb30f893585ed21aa1531863c727a42fbb', '4330e0469755c75b92a58a5f5002c729479147d470e6cc42a3206572352a1e28', '26e237aa2bc47082d06d49af58bbd65785cb979daf3110313d1484b95adac609', '8df45859ccd71ef1e48e2ee9d1c65d5728c31c46ae957d659fa4e5c3af6cc076', '59470fe7e847d5c05976da6c41fd27fa221b1fb7f7e3b76d2509994011435375', 'd9d809b2a22dfe4afcbe5351c5c3ca2ac6f375ae0dba65156ec9ea422428053b', '01c19c0ba392de6d2bee657a616eca254d8fa6d06dde299b73d4276381b54554', '03d0011487606c37c1b1ed147fc72f285a50c05f00b9712e0fc3da400c864296', 'c4e748d5bf4f10c86410d8b0cf62535ace6b502a80ed253ab4328f3eb3ca32ca', 'fc4842d6365813761635d..."}
7kumorfm
8{"query":"PREDICT COUNT(transactions.*, 0, 30, days) = 0\nFOR customers.customer_id IN ('8ef783d3815860cc145c2923f740f88728e373f2c3cb37aa638c15810ac531cc', '2d545e697d8cf36558c81eb56c1776cb30f893585ed21aa1531863c727a42fbb', '4330e0469755c75b92a58a5f5002c729479147d470e6cc42a3206572352a1e28', '26e237aa2bc47082d06d49af58bbd65785cb979daf3110313d1484b95adac609', '8df45859ccd71ef1e48e2ee9d1c65d5728c31c46ae957d659fa4e5c3af6cc076', '59470fe7e847d5c05976da6c41fd27fa221b1fb7f7e3b76d2509994011435375')\nWHERE COUNT(transactions.*, -90, 0, days) > 0"}
9
Our agent's final response is:
1I predicted churn likelihood for a sample of customers who have purchased in the last 90 days. Here are the results for six customers:
2
3
4- Customer 8ef783d3815860cc145c2923f740f88728e373f2c3cb37aa638c15810ac531cc has about 70.9% probability to churn (not make a purchase) in next 30 days.
5- Customer 2d545e697d8cf36558c81eb56c1776cb30f893585ed21aa1531863c727a42fbb has about 60.3% probability to churn.
6- Customer 4330e0469755c75b92a58a5f5002c729479147d470e6cc42a3206572352a1e28 has about 74.9% probability to churn.
7- Customer 26e237aa2bc47082d06d49af58bbd65785cb979daf3110313d1484b95adac609 has about 60.1% probability to churn.
8- Customer 8df45859ccd71ef1e48e2ee9d1c65d5728c31c46ae957d659fa4e5c3af6cc076 has about 38.3% probability to churn.
9- Customer 59470fe7e847d5c05976da6c41fd27fa221b1fb7f7e3b76d2509994011435375 has about 72.0% probability to churn.
10
11
12I can continue and extract more customers likely to churn or analyze churn for specific segments if you want.
13
We can continue the conversation with our agent for as long as we need - and in the example notebookwe do just that. But the code and the approach is the same, so we won't continue repeating ourselves here.
Over the several steps in our notebook example, we managed to produce a high-quality and personalized marketing email for our customer, using a process that can be easily run again and again for many customers.
1# final agent email output
2# ------------------------
3
4Subject: Thought You’d Like These Cozy New Arrivals
5
6Hi there,
7
8Since you’ve shown a love for cozy sweaters and hoodies, we thought you’d be interested in these picks we think you'd really like:
9
10- PE - CLARA SCARF [703737001] — A soft and stylish scarf that'll keep you warm and add a touch of elegance to any outfit. (You'll see an image of this beautiful scarf in the email!)
11
12- Love Lock Down Dress [633208001] — Perfect for both casual days and nights out, this dress pairs well with your favorite sweaters and jackets.
13
14- Joel Light Down Jacket [659460002] — Stay comfortably warm while looking sharp with this lightweight yet effective jacket.
15
16We hope one (or all!) of these catches your eye. We’d love to welcome you back soon — and who knows, there might even be a little surprise waiting for you when you do.
17
18Take care,
19
20The H&M Team
21
By integrating LLMs with KumoRFM's real-time predictive analytics, we've built a truly unique and powerful e-commerce agent. In our example, we demonstrated it's use as an "internal marketing copilot", but with this exact dataset and some small prompt tweaks, we could easily deploy an agent like this into a business analytics copilot, internal FAQ agent, or even serve the agent direct-to-consumers as an online shopping assistant.
Merging dynamic LLMs with KumoRFM's predictive capability allows us to do all of this and much more, both beyond these described e-commerce use-cases, and even beyond e-commerce into many other industries.
Join our community on Discord.
Connect with developers and data professionals, share ideas, get support, and stay informed about product updates, events, and best practices.