> ## Documentation Index
> Fetch the complete documentation index at: https://kumo.ai/docs/llms.txt
> Use this file to discover all available pages before exploring further.
# Installing the Databricks Native App
## Prerequisites
The following prerequisites are required in order to run Kumo as a Databricks native application:
* A dedicated service principal in your Databricks workspace to be used by Kumo
* A dedicated, all-purpose compute cluster with “Shared” access mode (version 14.3 LTS), with “Can Manage” permissions assigned to the Kumo service principal
* The above cluster needs to be appropriately sized for the amount of anticipated data processed by Kumo. See suggested cluster sizing below:
* Set auto-scaling to a max of 8 AWS r6id-2xlarge equivalent worker nodes for data size under 100GB
* Set auto-scaling to a max of 30 AWS r6id-2xlarge equivalent worker nodes for data size above 100GB under 300GB
* Set auto-scaling to a max of 100 AWS r6id-2xlarge equivalent worker nodes for data size above 300GB
* A dedicated small size Serverless SQL warehouse, with “Can manage” permissions assigned to the Kumo service principal
* Unity Catalog table access assigned to the Kumo service principal
* A dedicated Unity Catalog Volume for which the Kumo service principal can read and write. All Kumo generated data will be stored in this volume.
After creating these Databricks resources, you will need to share the following information with Kumo in order to create the environment:
* Your Databricks workspace host URL
* The cluster ID for the dedicated, all-purpose compute cluster
* The warehouse ID for the dedicated, serverless SQL warehouse
* The name of the catalog and schema containing the tables to be accessed by Kumo
* The UC Volume path for the dedicated Unity Catalog Volume
* The Kumo service principal client ID and secret (client secret should be an OAuth token and not a personal access token)
### Required Catalog Permissions
The following table illustrates the list of permissions you should grant to the Kumo service principal:
 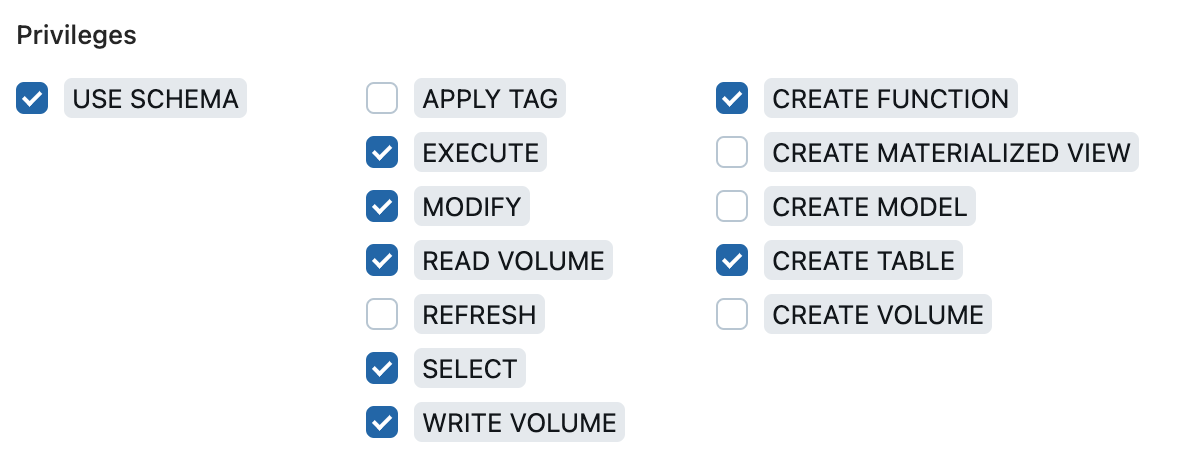
Specifically:
* USE\_CATALOG, USE\_SCHEMA, EXECUTE, SELECT, CREATE\_FUNCTION are needed on the catalog-schema containing tables to be read by Kumo
* USE\_CATALOG, USE\_SCHEMA, EXECUTE, MODIFY, SELECT, CREATE\_FUNCTION, CREATE\_TABLE are needed on the catalog-schema in which Kumo writes the batch prediction tables
* USE\_CATALOG, USE\_SCHEMA, READ\_VOLUME, WRITE\_VOLUME are needed on the catalog-schema in which Kumo writes intermediate data into your UC Volume
## Additional Steps
After creating the above Databricks resources, the following additional steps are needed to set up your Kumo native app for Databricks:
### JAR File Installation
The Kumo Databricks native app requires the following JAR files:
* feature\_proto\_scala.jar
* lenses\_sjs1\_2.12-0.11.11.jar
* protobuf-java-3.19.4.jar
* scalapb-runtime\_2.12-0.11.11.jar
* sst\_source\_0.0.1.jar
These files are hosted in our public S3 bucket:
s3://kumo-databricks-public/databricks-jars/
Important: Databricks cannot reference these public S3 paths directly
(including on AWS Databricks). You must download the JARs first and
then upload them to a Unity Catalog (UC) Volume before attaching them
to a cluster.
***
Step 1: Download the JAR Files
The bucket is public and does not require AWS credentials. You can
download all required JARs with:
# Download all files (public bucket, no AWS credentials required)
for u in \
s3://kumo-databricks-public/databricks-jars/feature\_proto\_scala.jar \
s3://kumo-databricks-public/databricks-jars/lenses\_sjs1\_2.12-0.11.11.jar \
s3://kumo-databricks-public/databricks-jars/protobuf-java-3.19.4.jar \
s3://kumo-databricks-public/databricks-jars/scalapb-runtime\_2.12-0.11.11.jar \
s3://kumo-databricks-public/databricks-jars/sst\_source\_0.0.1.jar
do
aws s3 cp --no-sign-request "\$u" .
done
After running this command, you should have all five .jar files locally.
***
Step 2: Upload the JARs to a Unity Catalog Volume
1. In the Databricks workspace, navigate to Catalog.
2. Select (or create) a Volume under the desired catalog and schema.
3. Upload the downloaded .jar files into that Volume.
Example target path:
`/Volumes////kumo-jars/`
***
Step 3: Allowlist the JAR Path in Unity Catalog
Before Databricks can use these JARs on shared or all-purpose clusters,
you must [allowlist](https://docs.databricks.com/en/data-governance/unity-catalog/manage-privileges/allowlist.html) the Volume path:
1. Go to Catalog.
2. Click Settings.
3. Open the Allowed JARs tab.
4. Add the UC Volume path that contains the uploaded JARs.
Save the changes.
***
Step 4: Attach the JARs to Your Cluster
1. Go to Compute.
2. Select your all-purpose cluster.
3. Open the Libraries tab.
4. Click Install New → JAR.
5. Provide the full UC Volume path for each JAR file.
After installation completes, restart the cluster if necessary.
### Grant Additional Permissions to Kumo Service Principal
Part of the compute pushed down by Kumo requires additional permissions to execute in your Databricks all-purpose cluster. Specifically, the [`spark_partition_id`](https://docs.databricks.com/en/sql/language-manual/functions/spark_partition.html) built-in function requires the following step:
Open Databricks SQL editor and execute the following query:
```Text SQL theme={null}
GRANT SELECT ON ANONYMOUS FUNCTION TO `SERVICE_PRINCIPAL_ID`;
```
`SERVICE_PRINCIPAL_ID` should be replaced with the client ID of the Kumo service principal created above.
### Databricks PrivateLink Requirements
Add the following IP addresses to your allowlist to enable Kumo VPC communication with your Databricks workspace.
* **us-west-2 region**
```
35.80.238.56
35.83.70.164
34.212.254.246
```
* **us-east-1 region**
```
44.194.239.160
3.93.235.2
98.83.20.158
```
### Data Sharing for Unity Catalog Volume
Kumo engineers helping to onboard your use cases may require temporarily access to the data generated by Kumo in your UC Volume. The data stored in your UC Volume is intermediate data generated by Kumo that does not contain raw data of the tables shared with Kumo. You should therefore create a dedicated UC Volume for usage by Kumo to facilitate sharing data in these cases.
Databricks provides this sharing capability via [Delta Sharing](https://docs.databricks.com/en/data-sharing/create-share.html). When Kumo requests sharing of the data, you can follow these steps to temporarily grant access to the data in your UC Volume, and revoke the access afterwards.
1. [Enable Delta sharing](https://docs.databricks.com/en/data-sharing/set-up.html) for your metastore if not already enabled
2. Add Kumo as a [Delta sharing recipient](https://docs.databricks.com/en/data-sharing/create-recipient.html). Kumo is a Databricks recipient, and our recipient ID is `aws:us-west-2:b7ab6fd5-7ee2-4fee-853c-d4e3716c4c01`
3. [Create a Delta sharing object](https://docs.databricks.com/en/data-sharing/create-share.html) for the UC Volume to be shared with Kumo.
4. Kumo’s access to the UC Volume can be [managed from Databricks](https://docs.databricks.com/en/data-sharing/grant-access.html).
More options are available in the Databricks documentation for things such as [auditing Delta sharing](https://docs.databricks.com/en/data-sharing/audit-logs.html).